
PPT Editor Pro - Help File
Overview
PPT Editor Pro is a presentation editor for Windows that lets you create, open, view, and edit slideshow files in common presentation formats. It provides the essential tools to build slides with text, images, SmartArt, and tables, apply themes and layouts for consistent design, and run a slideshow for presenting.
You can start from a blank slideshow or use templates from the launch window. When your presentation is ready, you can save it in your preferred format, print handouts, or create a PDF copy using Microsoft Print to PDF for sharing.
Product Support
If you have questions, encounter an issue, or need assistance, our support team is here to help. Please contact us via email at: support [at] everydayappsoft.com
If you enjoy using DOCX Editor Pro, please consider leaving a positive rating and review to help others discover the app.
1. Creating a New Presentation
PPT Editor Pro first displays a launch window before opening the main presentation editor. New presentations can be created either from this launch window or from within the editor itself.
On the launch window, select Create Slideshow to see the two available options:
Option 1: New Blank Slideshow
Select Create Slideshow > New Blank Slideshow.
The main editor opens with a new empty presentation.
Option 2: Create from Templates
Templates are useful when you need a predefined theme or slide layout (for example, a business deck or class presentation).
Select Create Slideshow > Create from Templates.
Choose a template from the list.
The editor opens with slides and formatting based on the selected template.
Create a new presentation from inside the editor
When the editor is already open, you can create a new presentation through the main menu:
Open the File menu.
Select Create New.
A new presentation tab is created, ready for editing.
2. Opening Existing Presentations
You can open a presentation from the launch window, from within the editor, or by dragging a file into the start screen.
Open from the launch window
On the launch window, select Open Slideshow.
Browse to the presentation file, select it, then choose Open.
Drag and drop to open
On the launch window, drag a presentation file onto the Open Slideshow area (or the “drag-and-drop files here” area).
The file opens in the editor.
Open while another presentation is already open
When the editor is already open, you can open another file through the main menu:
Open the File menu.
Select Open.
Browse to the file, select it, then choose Open.
Open a recent file
On the launch window, select a file from Recent to reopen it quickly.
Tip: If a file opens but some elements look different, save a copy as .pptx and continue editing from that version for the most consistent results.
3. Working with Slides
Slides are listed in the left thumbnail pane. You can add new slides, duplicate existing ones, change the order, or remove slides you no longer need.
Add a new slide
In the slide thumbnail pane, select the slide where you want to insert a new one.
Right-click and select New Slide (or press Ctrl+M) to add a slide using the current layout.
Duplicate a slide
Right-click the slide thumbnail.
Select Duplicate to create a copy with the same content and formatting.
Reorder slides
Drag a slide thumbnail up or down in the thumbnail pane to change the order.
Delete a slide
Select the slide thumbnail, then press Delete.
Or right-click the slide thumbnail and select Delete.
Change slide layout
Layouts control where placeholders appear (title, text, etc.).
Select the slide.
Choose Layout, then pick the layout you want.
Hide a slide (optional)
Hidden slides stay in the file but are skipped during presentation.
Right-click the slide thumbnail.
Select Hide Slide (or Show Slide to unhide it).
4. Adding and Formatting Content
Use placeholders and the toolbar formatting tools to build slides with clear text and consistent layout.
Add or edit text
Click a text placeholder and start typing.
To edit existing text, click inside the text box and make changes.
Format text
Select the text, then apply common formatting options:
Font and size
Bold, italic, underline
Text color
Bullets and numbering
Align text and paragraphs
Use alignment tools to left/center/right align text.
Adjust line spacing and indentation when needed.
Move, resize, and arrange objects
Select an object (text box, image, shape), then drag to move it.
Drag the corner handles to resize.
Use Arrange options to control layering:
Bring to front / Send to back
Align objects for clean layout
Group objects to move them together (optional)
Tip: Use Ctrl+Z to undo and Ctrl+Y to redo when adjusting layout.
5. Inserting Images, SmartArt, and Tables
You can insert common objects to build slides with richer visual content, then position and format them as needed.
Insert an image
Select Insert > Image, then choose a file from your PC.
Resize the image using the corner handles, and drag it to the desired location.
Insert SmartArt
SmartArt helps you present lists, processes, or hierarchies using a predefined layout.
Select Insert > SmartArt.
Choose a layout style (for example, List or Process), then select a layout type.
If your slide is empty and shows an Insert SmartArt placeholder, click it and then choose a layout the same way.
Tip: After inserting SmartArt, click inside it to edit the text, then use the formatting tools to adjust its appearance (such as colors or styles, if available).
Insert a table
Select Insert > Table.
Choose the number of rows and columns, then insert.
Click inside the table to type, and use the table tools to add/remove rows or columns.
Basic object alignment
For cleaner slides:
Select one or multiple objects, then use Align options to line them up.
Use Distribute options to space objects evenly (if available).
Tip: Hold Shift while resizing to keep an object’s proportions.
6. Themes and Slide Layout
Themes and layouts help keep your presentation consistent across slides.
Apply a theme
Open the Design tab.
Choose a Theme to apply it to the presentation.
Tip: If you change the theme after adding content, review your slides to make sure text, colors, and spacing still look right.
Change a slide layout
Layouts control where placeholders appear (title, text, images, etc.).
Select the slide (or slides) in the thumbnail pane.
Choose Change Layout, then pick the layout you want.
Reuse a consistent look
Use the same theme and a small set of layouts (for example, Title, Title and Content, Section Header) to keep the deck clean and easy to follow.
7. Presenting and Viewing
Use slideshow mode to present your slides, or preview and navigate through your deck while editing.
Start a slideshow
PPT Editor Pro provides two Start Slideshow buttons on the toolbar. Both use a play icon (a right-pointing triangle), similar to a media player:
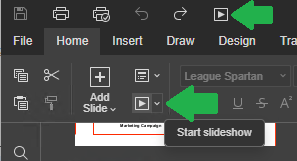
Title bar button: Select the play button near the top of the window to start slideshow mode quickly.
Home tab button: On the Home tab, select Start slideshow (play icon) to start presenting.
If available, you can choose to start from the beginning or from the current slide.
Navigate during presentation
Use the arrow keys to move forward or back.
Press Esc to exit slideshow mode.
Zoom and viewing controls
Use Zoom in/out to adjust the slide view while editing.
Use the slide thumbnail pane to jump to any slide quickly.
Tip: For smoother presenting, close heavy background apps and run slideshow in full screen when possible.
8. Saving, Printing, and Exporting
Use the File menu to save changes, create a copy, print slides, or save a PDF copy using Windows printing.
Save changes
Select File > Save to save updates to the current presentation.
Use Ctrl+S to save quickly.
Save a copy (Save As)
Select File > Save As.
Choose a folder and file name.
Select the format you want (for example, .pptx), then save.
Print slides
Select File > Print to open print settings and preview.
Choose the printer and adjust options such as:
Print range (all slides or selected slides)
Layout (full page slides or handouts, if available)
Orientation and margins
Select Print.
Save as PDF (Print to PDF)
If you need a PDF copy for sharing, you can print the presentation to a PDF file:
Select File > Print.
For Printer, choose Microsoft Print to PDF.
Select Print.
Choose a save location, enter a file name, then select Save.
Tip: Printing to PDF creates a separate PDF copy. Your original presentation file is not changed unless you also save it.
9. Supported File Formats
PPT Editor Pro is designed for PowerPoint-compatible presentation files and other common presentation formats. If a file opens but some elements look different, save a copy as .pptx and continue editing from that version for the most consistent results.
Presentation formats
PPTX – PowerPoint presentation (recommended)
PPT – legacy PowerPoint presentation
PPSX / PPS – PowerPoint slideshow files
POTX / POT – PowerPoint templates
ODP – OpenDocument Presentation
Export and sharing formats (common)
You can also create shareable copies using Windows printing options, such as Print to PDF.
10. Tips for Everyday Use
Keep layouts consistent. Reuse a small set of slide layouts (Title, Title and Content, Section Header) to keep the deck clean.
Use templates for faster setup. Start from a template when you need a ready-made theme and slide structure.
Limit fonts and colors. Two fonts and a consistent color palette usually make slides easier to read.
Align objects for a clean look. Use alignment tools to line up text boxes, images, SmartArt, and tables.
Avoid overcrowding slides. Break long content into multiple slides instead of shrinking the font too much.
Test slideshow mode early. Start a slideshow and review transitions, spacing, and readability before finalizing.
Print to PDF before sharing. If you want recipients to see the same layout, create a PDF copy using Microsoft Print to PDF.

Edit Microsoft Excel spreadsheets on Windows—open and save XLSX/XLS files, format cells, use formulas, sort/filter data, and export to PDF
